![]()
![]()
Revised: 03/05/2015
Go to Home>>Customer Portal

This is the login page for the Horizon Web Portal. Customers will be able to review and submit incidents for the Horizon Help Desk after they have logged in and will have the ability to search the knowledge base.
If you do not have a customer login please contact customer support at (800) 889-3388.
If you already have your login information enter it in this field.
Enter the password assigned to you.
After you have entered your login information, click the submit button to enter the Home page of the Customer Portal.
A sample of the customer portal is shown below:
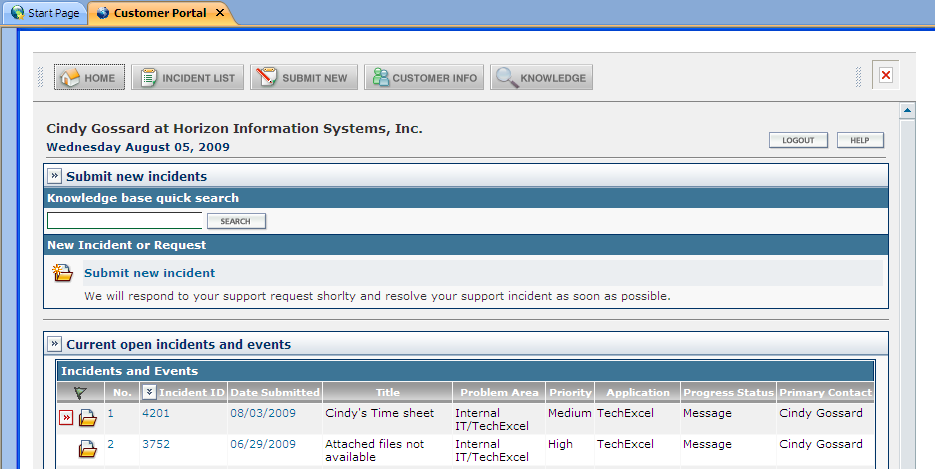
In the Customer Portal you will see a list of your current open incidents that have been submitted to Horizon.
At the top of every page of the Portal are buttons with the following labels:
![]() Click here for information on the Home page.
Click here for information on the Home page.
![]() Click here for information on the Incident List page.
Click here for information on the Incident List page.
![]() Click here for information on the Submit New page.
Click here for information on the Submit New page.
![]() Click here for information on the Customer Info page
Click here for information on the Customer Info page
![]() Click here for information on the Knowledge page.
Click here for information on the Knowledge page.
The home page is shown in the above Customer Portal sample. When you are in other areas of the Customer Portal clicking the Home button will return you to the home page.
The home page includes the following information:
Navigation Bar
User Name and Company information
Current Date
Logout button - this button will log the user out of the Customer Portal.
Help - accesses help information on the portal.
Knowledge base search field and button - enter information and click the search button to access the search results page showing matching knowledge articles.
Submit New Incident - opens the submission area where a new incident may be entered.
Current Open Incidents and Events - this area shows open incidents relating to the person logged in for the company.
The Incident List page opens with a listing of "Open" incidents. Users may view, edit, attach files and screen shots and mark an incident as resolved in this area.
The search button opens the search area. Input some or all of the following information and click submit:
ID Filter - enter the Incident ID number if known or leave this field blank.
Keywords - enter a word or words for the incident. For instance enter Cash Receipt as keywords.
Full Text - if the selection dot is in this field the program will search through all the text for a match to the keywords entered.
Title Only - if the selection dot is in this field the program will only search through the incident titles for a match.
Date Created (From/To) - if you know the approximate date range the incident was created enter the from/to dates here.
Problem Area - Select one of the problem areas from the list or leave blank to search through all.
Priority - Select one of the priorities from the list or leave blank to search through all.
Category - Select one of the categories from the list or leave blank to search through all.
Application - Select one of the applications from the list or leave blank to search through all.
Version - Select one of the versions from the list or leave blank to search through all.
Click the submit button to begin the search.
Click the cancel button to leave the search area without searching for an incident.
Users may change the incident status to one of the following options:
Open - default status. Help Desk tickets have been submitted and will be seen and responded to by help desk staff.
Mark as Resolved - Tickets shown under this status have been resolved.
Closed - Tickets shown under this status have been closed.
Open and Closed - Both open and closed tickets may be viewed.
Displays the list of incidents and the events tied to them. Click on any of the headers to sort the list. For example, click on "Priority" to sort the list of incidents by their priority.
Click on the Incident Number, Incident ID or Date Submitted to bring up the "Incident Info Box"
Use the submit, back or cancel buttons to save or return to a previous screen
In this info box you may review an individual incident, refresh the information, Logout, add a new attachment, add a new screen attachment or perform a search of the knowledge base.
Press the Refresh button to update the information shown on the screen
Press the Logout in the upper right to leave the Customer Portal to the Horizon Web Page. May also click the X on the Customer Portal tab to close the view.
Press the Update button to update information for the incident. Note: this only works if the user has permission to do this.
Press the Work Description button to view information on work that has been done for the incident.
Press the New Attachment button to go to the Select a File dialog view. Enter or browse to the file you wish to attach.
Press the New Screen button to go to the New Event Screen Capture dialog view.
Click the capture button and keeping the left click held down move to the area you want to capture and release the left click.
When the screen capture window pops up, make any notes on it that are needed and save. When you close the screen capture window it will ask you if you want to attach the captured image to the main application. Click "Yes" to attach the screen shot.
You may also click the Help button for additional help on screen captures.
If the Enable KnowledgeWise Auto Search to recommend relevant knowledge was checked when the new incident was created the results will be displayed under this area.
![]() Click this button to perform an auto search while in the Incident View to access any of the information in the knowledge base.
Click this button to perform an auto search while in the Incident View to access any of the information in the knowledge base.
At the bottom of the Incident Info view is a place for customers to enter a note for the help desk agent.
Enter a note and click "Submit"
Mark as Resolved - Customers may check this box to indicate that the incident has been fixed or is no longer an issue.
A sample of the Incident Info Box is shown below:
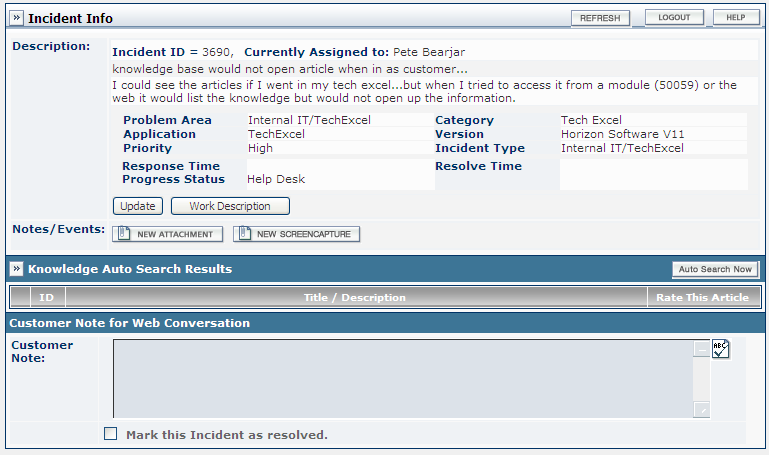
Users may review incident information, enter notes and attach documents or screen captures
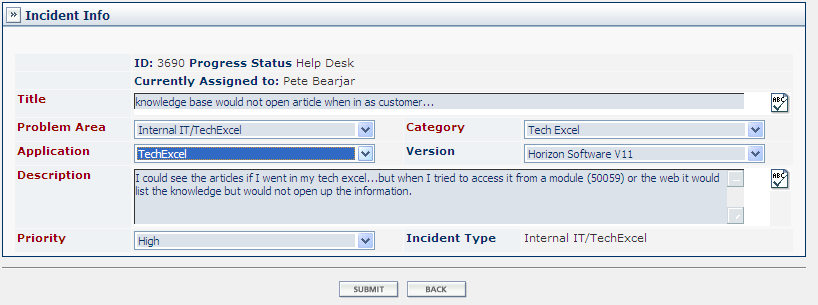
Clicking the update button allows users to edit incident information. See example below:
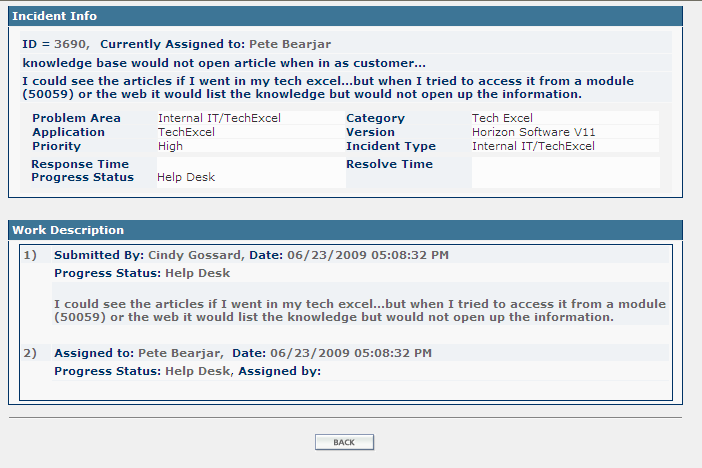
Clicking the Work Description button shows incident information along with work that has been done on the incident. Click the Back button to return to the Info Box. See sample below:
Click the New Attachment button to go to the Select a File screen. Click the browse button to navigate to the document. When you have the file/path in the field click the continue button to attach it or click the cancel button without attaching the file. See sample below:

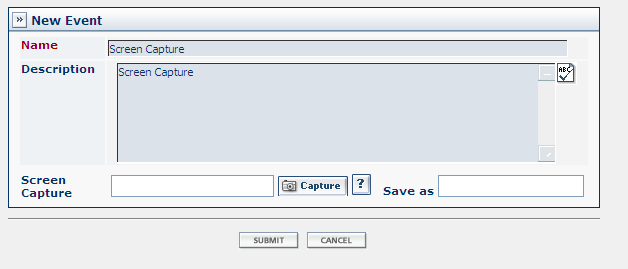
Click the New Screencapture button to go to the New Event area where you can perform the screen capture. Drag the ![]() button to the area you want to capture and drop it. Once you are in "capture" mode the module you are in will minimize. You will be unable to capture an error from within the module that you entered the Customer Portal from. Enter a description for the screen capture and name it in the save as field. For more information on screen captures click the ? beside the capture button. See a sample of the screen capture screen below:
button to the area you want to capture and drop it. Once you are in "capture" mode the module you are in will minimize. You will be unable to capture an error from within the module that you entered the Customer Portal from. Enter a description for the screen capture and name it in the save as field. For more information on screen captures click the ? beside the capture button. See a sample of the screen capture screen below:
Clicking the Submit New button will take you to the New Incident view where you will be able to enter incident information.
NOTE:
Please search the knowledge base to see if there is an answer for your incident before you submit it.
Select an incident type from the following:
Software Support
IT Support
Enter a title for the incident.
For an incident type of Software Support select Horizon Software.
For an incident type of IT Support select one of the following:
IT - Hardware
IT - Networking
IT - General
IT - Ordering/Pricing
IT - Virus/Malware
For an Incident Type of Software Support select one of the following:
Financials Product Line
Housing Product Line
Human Service Product Line
Specialized Sales Product Line
DataSan Product Line
Other Product Lines
For an Incident Type of IT Support select one of the following:
Workstation/Desktop
Laptop
Software/Non-Horizon
Server
Networking
Printing
On-Site Support Request
Quoting/Ordering/Pricing
Remote Support Request
Virus/Malware
Remote Access
Security
Internet
For an Incident Type of Software Support and a Category of Financials Product Line select one of the following:
Accounts Receivable
Job Costing
Fixed Assets
Implementation Project
ACH Processing
Sales
Financials (GL/AP)
Payroll
Materials Management (PO/IN)
For an Incident Type of Software Support and a Category of Housing Product Line select one of the following:
Inspections
Implementation Project
Housing Contract Management
Housing Billing
Maintenance Management
50059/Voucher Processing
50058 Processing
Waiting List
Tenant Management
Section 8 Tenant Management
For an Incident Type of Software Support and a Category of Human Service Product Line select one of the following:
Consumer Management
Accounts Receivable
Transportation
Prescription Tracking
Human Resources
Weatherization
Rep Payee
Implementation Project
Contract Management
Food Bank Management
For an Incident Type of Software Support and a Category of Specialized Sales Product Line and DataSan Product Line select one of the following:
Accounts Receivable
Legal System
Implementation Project
Utility Billing
Sales
For an Incident Type of Software Support and a Category of Other Product Line select one of the following:
Portal/GUI
Cellular Billing
Debt Collection
Update management
Administrative Setup
Implementation Project
For an Incident Type of IT Support select one of the following:
Other/Non-Horizon
Symantec Backup Exec
Syantec Anti-Virus
Hardware - General
Networking
Operating System
Consumer Management - on Printing, Remote Support Request and Remote Access
IT - on Workstation/Desktop, Email, Server and Printing
For an Incident Type of Software Support select one of the following versions:
Horizon Software V11
Horizon Software V14
Horizon Software V15
Stratus Software
With an Incident Type of IT there are no version selections.
Select one of the following ratings:
High
Medium
Low
Enter a description of the incident.
Check this box to perform a search of the knowledge articles based on the incident being submitted.
Click the submit button to send the incident to Horizon.
Click the cancel button to close the incident without submitting to Horizon.
Add or edit the following to the company profile:
Address including city, state and zip code information
Fax number
Web address
Customer ID
Double click on the blue contact name to add or edit contact information.
Contact Name - Click on a contact name to open that contact's information for editing. Add or edit the following information:
Name information - first and last
Title - Enter the contact's title or select an appropriate title from the drop down menu.
Same as the Company Address - Check the box if the address is the same as the company. This will make the company information unavailable to edit.
Phone and Fax - Enter all relevant phone numbers and fax numbers.
This page contains the knowledge search and browse area where users may enter keywords to search for information that may help them with an incident.
Click on the links on the left side of this page to open knowledge topics for the modules. Just keep clicking the + till you get to the module you want information on.
Knowledge subjects for the module you select will be shown on the right. Click on the subject to open the Knowledge Details.
Note: If you select a module the search with keywords will be restricted to that module.
Enter a key word and press search to find topics related or containing the keyword.
Note:
If you have a module selected that does not pertain to the keyword entered you may not get any results for the search.