![]()
![]()
Revised: 08/21/2012
Go to Tools>> Merge Setup
![]()
This program is used to setup a letter or form with variables that can pull information from Inspection. information
The following information is in this help file:
Select an existing code to edit a form/letter or enter a unique code for the form/letter you will be designing. The code may be numbers or letters or a combination of both.
Once the code has been entered and saved, it may not be changed. The description and the design of the form may be changed.
Enter a description for the form/letter you will be designing. Users will see and use the description to select a letter or form in Custom Forms and Letters
Select one of the following letter types:
Shared Component - Use this letter type to do parts of letters or forms that will be shared or imported into other forms. For example a letterhead.
Standard Family Letter/Form - Use this options to design general letters or forms.
Quick Letter - Use quick letter forms to setup letters with a blank body. Currently this option does not print in Inspections.
Letter types may be changed at any time; however; some variables will not work with some letter types.
Enter the number of pages for the letter. The number of pages may be changed as needed. For templates with more than one page the additional pages must also be setup as layers in the Edit Layout (design) area.
This area may be left blank, or you may select an inspection number whose applicable information will be merged into Edit Layout, Preview Sample or Print Sample in Merge Setup.
Click on this button to activate the Edit Layout area where a form/letter can be edited or designed.
Click this button to preview the letter/form.
Click this button to print the letter/form. Brings up a Print Options box shown below:

Displays the selected printer. Click "Change" button to select a different printer.
Defaults to "Printer". Leave at this option to print to the selected printer or click the arrow button and select preview to view the letter or form on screen.
Click the start button to print or preview.
*****************
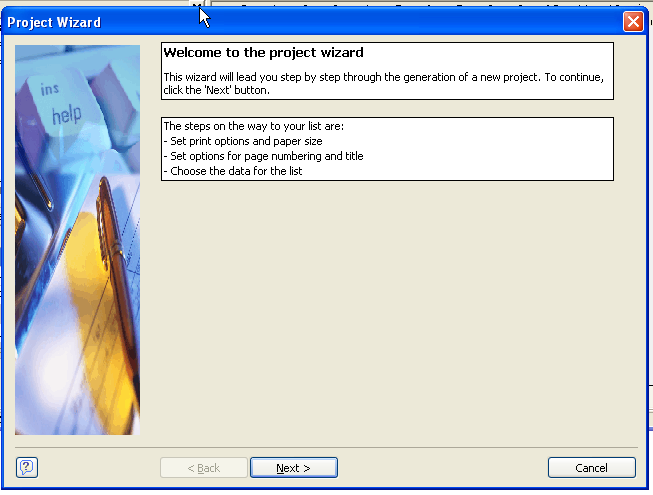
The following view will be the first thing that appears when opening a new form/letter. The project wizard may be cancelled which will take them to Edit Layout. Users may click Next through the wizard selecting or un-selecting options for the form/letter. For an existing form or letter the design button will take users directly to Edit Layout.
This is the view where template designs are created.
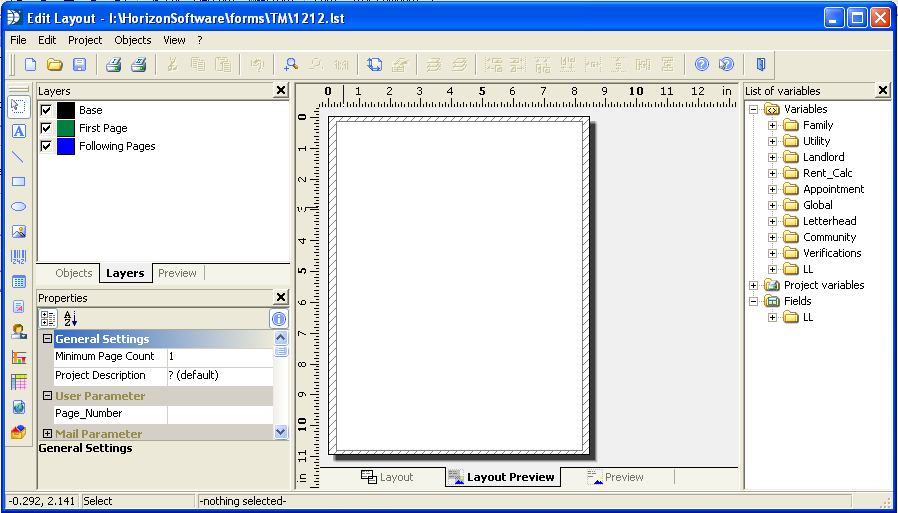
![]()
This is where you will design your form. There are three ways to view your form (tabs at the bottom of page). Layout, Layout Preview and Preview. You may design the form in any of the three views.
Use the control icons along the far left side of the edit layout or use the menus at the top of the page to insert text and objects onto the form/letter. The controls are explained below in the order the icons are displayed.
Variables shown on the far right may be dragged and dropped onto the page or you may use a text field to insert variables.
Caution: If you drag a variable directly onto/into a text portion of a letter or form, it will wipe out all of the text. Undo does not fix this. If you have been saving frequently you may close out of the form without saving changes. You will loose any unsaved information, but all saved text will still be available.
The following "control" information does not include every tool available, but only those most commonly used in letters or forms.
![]() This is the select tool. It may be activated from the control panel on the left side of the edit layout, or you may use the keystrokes Ctrl S; or you may activate it from the menu under Objects; Select; Selection Mode. This is the default "mode" for the cursor when Edit Layout is opened.
This is the select tool. It may be activated from the control panel on the left side of the edit layout, or you may use the keystrokes Ctrl S; or you may activate it from the menu under Objects; Select; Selection Mode. This is the default "mode" for the cursor when Edit Layout is opened.
For example: Click on the Select tool and drag it on the page it to select one item or a group of objects on the page. After the object or objects have been selected you may move them as a group to another location (drag n drop).
![]() Use the text button to insert text or variables into the form/letter. From the menu under Objects; Insert; Text, or use the keystrokes Ctrl T.
Use the text button to insert text or variables into the form/letter. From the menu under Objects; Insert; Text, or use the keystrokes Ctrl T.
For example: Click on the text option and drag the cursor on the page to insert a text box. Double click on the box to open it as shown below.
Double click on the dotted line on the left to open it further. (--- ) on left side of view
When you return to the above view you can add a second line of data into the text box by clicking the next line (---) to open the Edit Text box for a second, third, fourth or etc line of data.
Text may be entered under the Text tab and the Insert button used to drop it into the window or text may be entered into the bottom panel within quote marks. Text must begin and end with " (quotes)or there will be an error message.
Note:
If you are entering text under the Text tab, the program will enclose the text in quotes.
Text example:
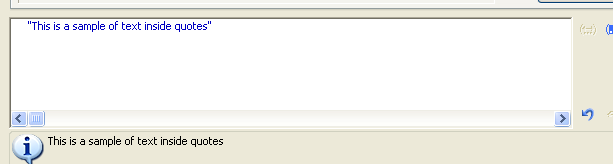
After entering your information, click OK at the bottom of the view to return to Paragraph Properties. Another line of text may be entered in the same manner on the next line
Enter a Variable into Text (some of the information here applies to Formatted Text as well)
Open the variable folder. Variables may be selected from the top window (double click on one) to insert them into the bottom panel. Variables do not need the ". The " " may be used to insert a space between linked variables. Variables may be placed one after another with a + between them.
Note: Variables may be placed onto a form without opening the text field, by dragging and dropping them. Caution: do not drop a variable into a text field as it will wipe out the text.
For example:
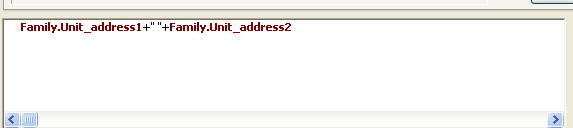
In the above sample the first line of the unit's address is linked with the +. The " " puts a space between the two lines of address and the following + finishes the link. If a space was not needed between the two address lines, you could link with just one +.
Other Formula Options
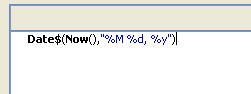
Insert Current Date - go to Date$ tab and double click on a date line. (Result shows how the date will look) The date inserted will be the current date.
Add days to Current Date - follow the add a date instructions but do not click ok yet. Add a + with the number of days to add after Now() and before the comma.
For example: Date$(Now()+20,"%m/%d/%y") this will return a date 20 days in the future.
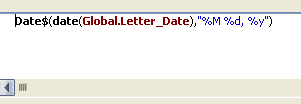
Change how the variable "Letter Date" looks - Follow Insert Current Date instructions but open Variables and Functions tab after you select the date format. Highlight Now() and double click the letter date variable found under the Global folder.
For example:
 this is the date format that shows month day, year.
![]() highlight Now()
highlight Now()
 double click "Letter Date" under Global This will insert the letter date in the style selected.
After entering your information, click OK at the bottom of the view. You will be back at the Paragraph properties view.
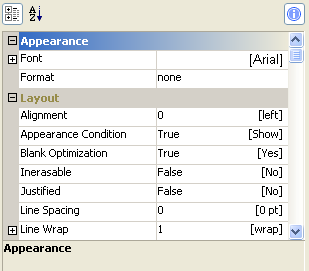
Highlight the line of text and format it if you desire. Each line may be formatted the same or they may each be different.
You can format the text or information with the properties on the right side of the Paragraph Properties view.
If you click on the + beside font to open it ...click the font selections. When open you will see:
![]()
Click the ![]() button to open up the font selection box:
button to open up the font selection box:

You can select the font, style, size and color. Click OK when done.
Under Layout you can:
Align the text in the box (click left and change to right or centered)
Set spacing between additional lines within the text box by entering a number. (12 or 15 gives the appearance of double spacing. This only works for lines within the same text box.
Remember to click OK to close the text box or your information will not be saved.
![]() Use the line button to draw lines on the grid. Tables are drawn in with lines. From the menu go to Objects, insert line. Or use Ctrl + L.
Use the line button to draw lines on the grid. Tables are drawn in with lines. From the menu go to Objects, insert line. Or use Ctrl + L.
Drag the + across the page to "draw" the line.
You can change the properties of the line by clicking on the line and opening the desired option under properties.
Change the color from gray to black
Click Width
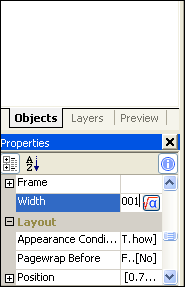
Click the ![]() to open the Edit Width box or just change the number to a higher number .001 change to .005 (with a width of .005 the line will be darker and not light gray)
to open the Edit Width box or just change the number to a higher number .001 change to .005 (with a width of .005 the line will be darker and not light gray)
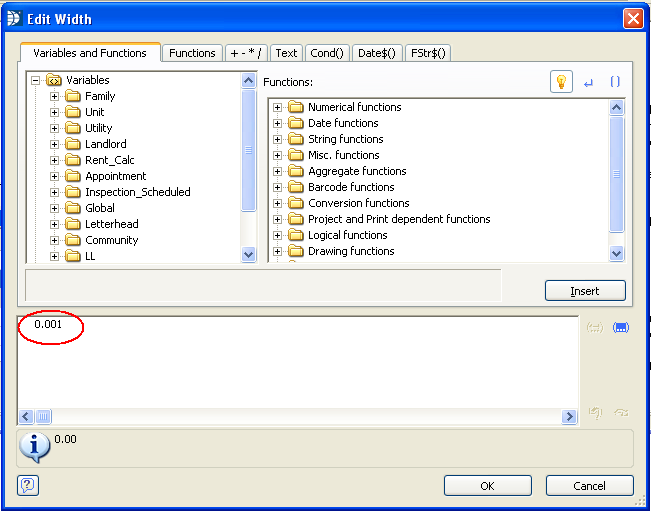
Change the number to 0.005 or a higher number to achieve the look you desire. Click Ok to accept your change or cancel to close the box without the change.
TIP: Once I have one line formatted the way I want it to look I copy and paste to get other lines I need. Ctrl+C to copy and Ctrl+V to paste and then drag or use the arrow keys to get the copied line into position.
To tweak the line position - how straight it is etc. I use Position under Properties:
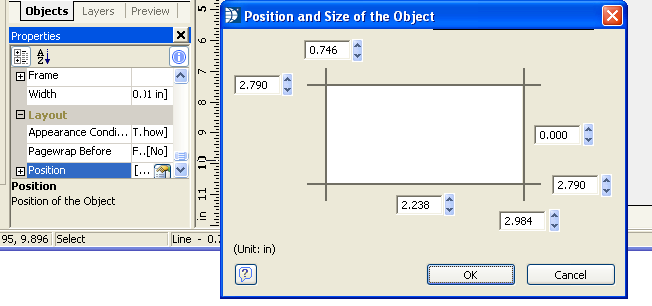
When the 2.790 (or whatever numbers your view shows) numbers match the line will be straight. (The numbers will be different depending where the line is on the page)
Use the position and size information in making a table.
![]() Click the rectangle icon or use Options>>Insert>>Rectangle or use Ctrl + R.
Click the rectangle icon or use Options>>Insert>>Rectangle or use Ctrl + R.
Go to the page and drag the rectangle onto the page.
The width option is found under border. Use the Width option to make the line show up (.001 is light grey) This works the same as the width option for line.
Use the Filled option to make the rectangle transparent or filled with a color.
![]() Click the ellipse icon or use Options>>Insert>>Ellipse or use Ctrl + I.
Click the ellipse icon or use Options>>Insert>>Ellipse or use Ctrl + I.
Use the ellipse in the same way as the rectangle.
![]() Use the picture icon, Ctrl + P or go to Options>>Insert>>Picture.
Use the picture icon, Ctrl + P or go to Options>>Insert>>Picture.
Drag the picture field onto the page.
Double click the picture field you created on the page. This will open a browse box where you can find a picture or logo to insert into the picture field.
Check the Embed in Project option. This way if the picture is moved or deleted it will not affect the letter or form.
You can reshape, reposition or resize the picture field after the logo or .jpg is inserted.
![]() The table is used with variables and does not create a static or stationary table like word. The table is only created for variable data that is to be merged so gaps in a table may occur.
The table is used with variables and does not create a static or stationary table like word. The table is only created for variable data that is to be merged so gaps in a table may occur.
Drag the table onto the page.
Open Layout option (click layout tab at the bottom of the page...this seems to work best when inserting merge info)
Drag a table variable into the table
Only the variables at the bottom of the variable list under Fields can be inserted into a table
When the variable is dragged into the table it creates two lines
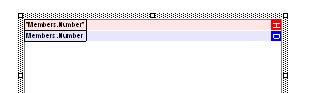
The top line is the column header
The bottom line is the variable data field.
After all the variables are dragged into the table double click the table to open up the Table Contents edit area shown in the next picture.
The length of the variable fields may be changed using the mouse to drag them smaller or wider.
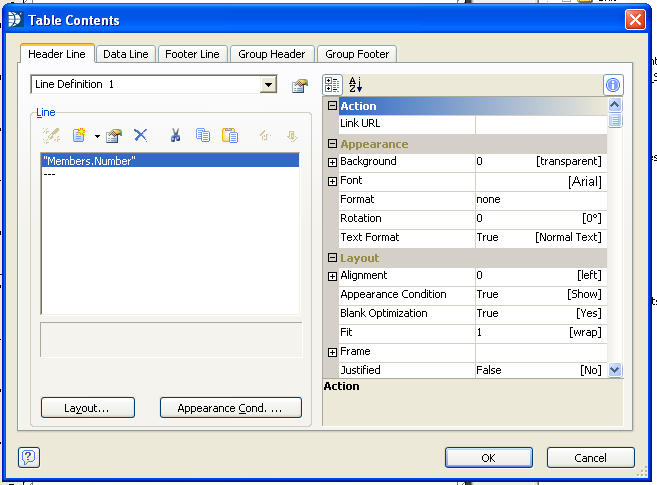
Header Line information may be changed to a more appropriate Table header.
For example:
Members.Number can be changed to "Member No", "Member #" or "Member Number" (text must be in quotes)
Data Line coding or information should not be changed or the information will not be pulled.
Font and alignment information may be changed for both the header and the data lines.
Note:
Table information does not display correctly in the Merge Template preview. The letter/form must be viewed from the program's Custom Forms and Letters.
![]() Click the button to drag and drop a formatted text field onto the page.
Click the button to drag and drop a formatted text field onto the page.
Double click the formatted text field to open it and begin typing
Text in a formatted text field does not need to be enclosed in quotes (").
The text can be formatted - underlined, made bold, indented, etc.
All formatted text fields must have their Page Break set to False or No in Properties. If the page break is set to True or Yes the form or letter may stop printing after the formatted text field.
Text can be copied (Ctrl+C)and pasted (Ctrl+V) from a Word document into an opened Formatted Text field.
Variables can be inserted into a formatted text document using the ![]() button. This button opens an Edit Function box.
button. This button opens an Edit Function box.
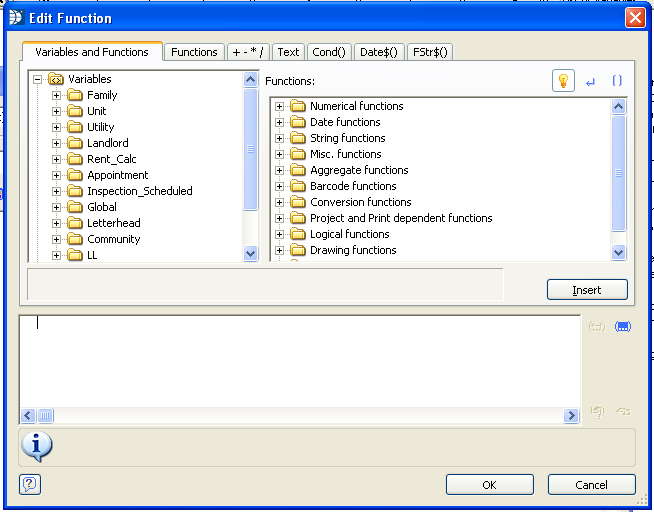
Open a variable folder and double click a Text (![]() ) variable to insert it into the bottom window. Click OK. You will be back in the formatted text view where you will see the formula inclosed in << >>. The information for the formula may not show until you print or preview the form for a tenant.
) variable to insert it into the bottom window. Click OK. You will be back in the formatted text view where you will see the formula inclosed in << >>. The information for the formula may not show until you print or preview the form for a tenant.
A number (![]() ) variable will not work properly in a formatted text box unless it is inserted into a formula. For example - click the FSTR$ tab and double click the first formula as shown below
) variable will not work properly in a formatted text box unless it is inserted into a formula. For example - click the FSTR$ tab and double click the first formula as shown below
![]()
This will enter the formula into the bottom window and Number will be highlighted
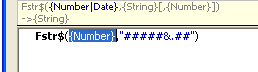
Click the Variables and Functions tab and double click the number variable which will replace the word Number in the formula with the variable.

Click OK to close the Edit window. You will be back in the Formatted Text window where you can continue to enter text.
When you are done entering text click the Apply button and then the OK button to close the formatted text window.
![]() Click the button and drag the form control field onto the page. If this form is used in a letter or form Preview Only under Special Options should be checked.
Click the button and drag the form control field onto the page. If this form is used in a letter or form Preview Only under Special Options should be checked.
A form control field allows the user to type an entry or check mark a box when the form is previewed.
Some suggested property changes:
Force Input - if left to true the user must type or checkmark it. An error will occur if the field is skipped. Change to false if the field may be left blank or unchecked.
Type - (under Action) can be changed to Checkbox. A checkmark would be placed in the form when it is clicked during the preview process.
Multiline - Can be changed from a single line to Multiline to allow for multiple lines of type to be entered.
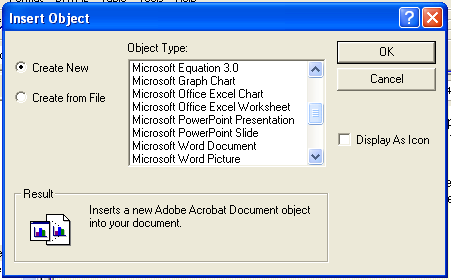
![]() The OLE container allows the user to select a type for the object. For example: The type selected could be a Word document. This will open Microsoft Word and allow a form or letter to be created in it and inserted into the document.
The OLE container allows the user to select a type for the object. For example: The type selected could be a Word document. This will open Microsoft Word and allow a form or letter to be created in it and inserted into the document.
NOTE: Word or Corel must be installed on the computer the document is being created or edited on.
This graphic shows part of the list that is available for selecting.
You can use tables in the word documents. Sometimes the information looks out of proportion in the document, but may print out ok. Sometimes it does not print out the same for everyone.
You cannot add merge fields in the OLE container documents and inserting them in text fields on top of the text document does not always work well because printer selection can affect text spacing when the document is printed.
Usually at the top left of the edit layout are three viewing options. Layers is one of the options.
If Layers is missing you can go to View>>Windows and check Layers to get it back.
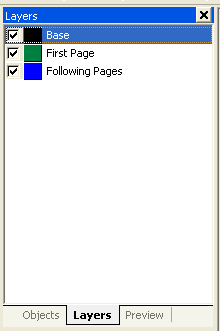
If you are going to be adding pages - remove the checkmark from Base and Following Pages. If Base is left checked everything put on a page will end up on the base page and will print on every page thereafter. Some verification forms must be created and saved on the base page.
To Add A Page:
Right click on one of the pages and select Layer Definitions from the drop down menu or go to Project>>Layer Definitions.
Change the name of following pages to Page 2 and change the Condition to Page() = 2 as shown below. Click OK to accept the changes and close the box or add another page
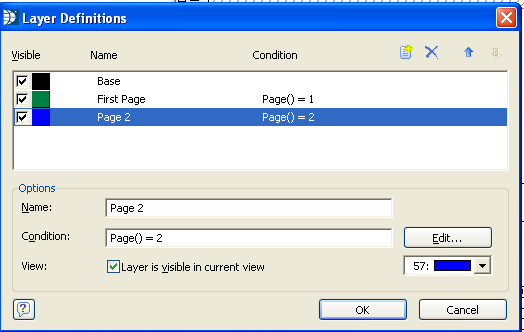
Add a 3rd page by clicking the insert button ![]() use the arrows by the insert button to move the page into the proper order. Name the page and add the condition in the same format as page 2 just change the 2 to a 3. Continue to add pages as needed and then click OK. Remember to change the Page amount on the Merge template front screen to the correct number of pages.
use the arrows by the insert button to move the page into the proper order. Name the page and add the condition in the same format as page 2 just change the 2 to a 3. Continue to add pages as needed and then click OK. Remember to change the Page amount on the Merge template front screen to the correct number of pages.
To Work on a Page
In Layers, remove all the checkmarks from the pages except for the one you will be working on.
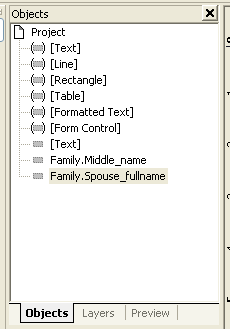
The object list displays all the objects you have in the project. Objects that are on pages that are not checked or active are shown in parenthesis.
If the object list is not shown go to View>>Windows and select Object List to make it active again.
You can open an object on an active page by double clicking it when highlighted. This is useful when it is hard to click on an object on a page.
Preview shows a small preview of an active page.
If missing go to View>>Windows and check Preview.
Displays and allows editing of properties for an object. Editing of properties has been discussed for objects.
If missing go to View>>Windows and click Property Window
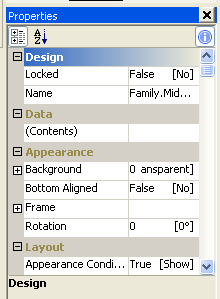
Some properties that can be changed for some objects:
Page Break - should be No or False for Formatted Text
Width - can be changed to make lines darker
Color - can change from gray to black (or any other color in the list) (version 17 List n Label)
Multiline - can allow a single line of type or multiple lines (Form Control)
Font - can change the font in some objects
Type - For form control can be changed to a checkbox, combo box or button if needed
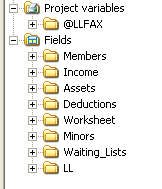
The list of variables that may be placed on a form or letter are shown on the right side of the Edit View. The variables that are available change depending on the letter type selected or the module merge is accessed from.
If the list is not shown go to View>>Windows and click Variables
Open the folders to see the variables.
Variables may be dragged onto a page or may be inserted using Text or Formatted Text (do not drag and drop a variable onto a formatted text field as it will erase the text)
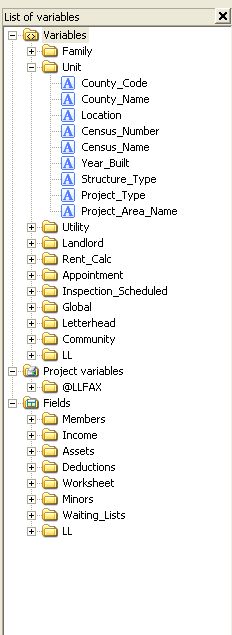
A variable may be dragged onto an open area of the form/letter and them moved overtop a text field. This will not erase the text. It is only during the initial drag n drop that text is erased.