
Service Import Process
This process allows you to import service data from a CSV file to create billable services in the system.
The import file must follow a specific format for the process to work correctly. Before performing your first import, contact the Horizon Help Desk so we can review your import template.
Setup the Import File
- The file must be setup according to the Required Column Layout.
- Enter the information for the services you want to import.
- You can complete the file in Excel.
- After completing the file, save the file to your computer as CSV (.csv).
- Do not reopen and resave the file in Excel format, as this will change the formatting of the file.
- If you open a CSV file in Excel and receive a prompt asking to convert it, click NO.
Required Column Layout
The CSV file must contain the following columns in this exact order, even if some columns are not used.
Columns marked as required are necessary for the import to work. If any required field is missing, the services will not import.
| COLUMN | COLUMN TITLE | DESCRIPTION | REQUIRED |
| A | Consumer MHX | Recipient number from the Consumer Master (example: 123456789) | Yes |
| B | Client ID | Consumer Case Number from the Consumer Master | |
| C | Provider Location # | Facility provider number - no dash | Yes |
| D | Service Date | Date the service occurred | Yes |
| E | Begin Time | Used when calculating units based on time (such as 15-minute units) | |
| F | AM/PM1 | ||
| G | End Time | ||
| H | AM/PM2 | ||
| I | Procedure Code | Procedure code for the service (example: W7070, W9029-U6-HI) | Yes |
| J | Employee | Employee number providing the service | |
| K | CPS Location | Required if a CSP service code is listed in Column I | Yes |
| L | Rate | Unit reimbursement rate | Yes |
| M | Merged Units | Number of units provided | Yes |
| N | Covid | Used to indicate COVID-related services | |
| O | Diag | Consumer diagnosis code | |
| P | Always Blank |
Additional Columns
If you want to include additional information in the file (for example, the client name or calculations):
- Column P must remain blank
- Any additional data should begin in Column Q
Sample Completed File

Import the Completed File
![]() The file must be saved as CSV before importing.
The file must be saved as CSV before importing.
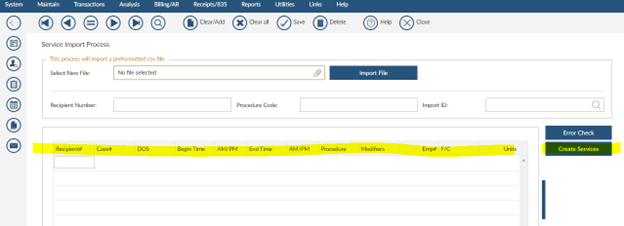
 NAVIGATION: UTILITIES menu > Service Import Process
- In the Select New File field, click the paperclip icon.
- The Open dialog box will appear.
- Navigate to the file location on your computer.
- Select the file.
- Click Open.
- The system will return to the Service Import Process screen.
- Click IMPORT FILE
- The grid will populate with the information from the file.

![]() IMPORTANT
IMPORTANT
- Once you import a file, an unique Import ID is created.
- If you leave the screen and want to continue working on the import, use the browse on the Import ID field.
- The system will not allow two files with the same name to be imported.
Check for Errors
- Click ERROR CHECK to run the Service Import Review report.
- If there are errors, the report will display them at the beginning under Error With Records.

- Review each line to see the description of what is missing or incorrect.
- If there are no errors, the report will display a list of all services.

- Review the report to confirm that the consumer, date of service, facility, and other details are correct.
- Correct any errors directly in the Service Import grid.
- If you make an edit, press Tab until the cursor moves to the next row to save the change.
- Run ERROR CHECK again to verify that all errors are resolved.
- If there are any errors, the report will show them at the beginning of the report grouped by Error With Records. Review each line to see the description of what is missing or incorrect.
Create the Services
- Once the Service Import Review report is correct, click CREATE SERVICES
- The Service Import Import Register will appear showing all the services that were created.
- Review the total charge amount and claim count.

- Review the Service Detail Report to verify the created services.
- If you run the Service Detail report immediately after creating services, the report may appear blank. Please wait a few minutes and run the report again.
Review Previous Imports
- Click browse on the IMPORT ID field.
- A list of the import will appear sorted by ID number.
- If services were created, the last column will display a checkmark.
- Select the import you want to review.
- The grid will populate with the imported services.

3/2026