
Void a Check
Follow the steps below to void a check that was processed in the system. After you post a void voucher, the expense will be reversed in the client's account. To reissue a new check, re-enter and post the transaction in Expense Entry; then print checks.
![]() NAVIGATION: ACTIVITIES menu > Payable Vouchers > Voucher Entry
NAVIGATION: ACTIVITIES menu > Payable Vouchers > Voucher Entry
- In the SPECIAL VOUCHERS section (top right), use the drop down to select VOID CHECK.
- Click the SELECT button.
- The Void Check Selection dialog box will open.
- Select the Check Book ID.
- Enter the check number to be voided in both the Starting and Ending Check fields.
- If you do not have the exact check number or if you have several checks to void, enter a range of check numbers in the Starting and Ending Check fields.
- Click the BUILD SELECTION GRID button to populate the grid with the check number(s).
- Place a check mark in the box next to the check/checks you need to void.
- Enter the Transaction Date (located at the bottom of the grid).
- This is the date the voided check will be added back to the client balance and to the checkbook.
- It is very important to have a Transaction Date in this field.
- Horizon recommends that you do not use a date earlier than Bank Reconciliations have been completed for.
- Click the CREATE VOID button.
- This will create a negative voucher that, when posted, will void the check and reverse all entries from the original voucher and check processing.
- This will also enter a Void entry in the Client's account to return the funds.
- Do not alter the created voucher, it needs to post as is.
- Proceed to review the void voucher.
Voucher Edit List
 NAVIGATION: ACTIVITIES menu > Payable Vouchers > Voucher Edit List
- Select the Pay Group
- Source Selections: uncheck everything except Voids
- Check the NOTIFY box and then click the RUN REPORT button. When the edit list is completed, a prompt will appear to open the report.
- Remember, Void vouchers that have been created during this process should not be altered.
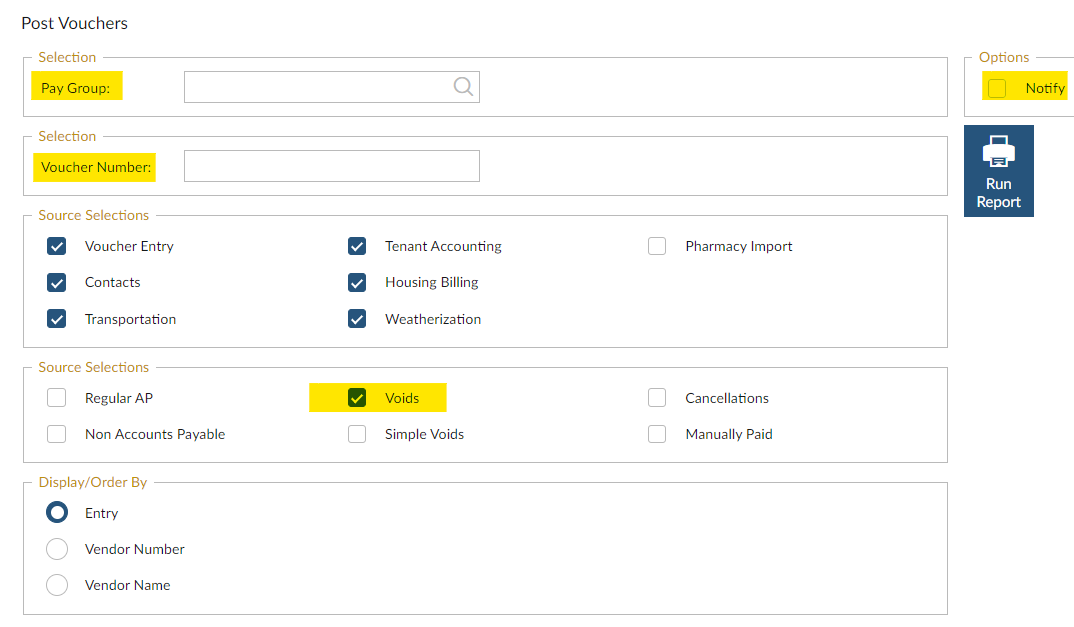
Post Vouchers
NAVIGATION: ACTIVITIES menu > Payable Vouchers > Post Vouchers
- Select the Pay Group
- Voucher Number: enter a specific voucher number to post one voucher from among many. If posting all vouchers, leave this field blank.
- Source Selections: uncheck everything except Voids
- Check the NOTIFY box and then click the RUN REPORT button. When the posting is completed, a prompt will appear to open the report.
- Print the Posting Register for your records
 This feature is only available if your site is setup at an Enterprise level (you see the Check Processing menu).
7/2024