
Checkbook Reconciliation
Your month end process should include reconciling the checkbook and verifying client balances.
What Is Bank Reconciliation?
It’s how you make sure your records match your bank’s records. You check for any differences and fix them.
What To Do Before You Start
- Make sure all deposits, checks, and electronic payments, are posted
- Make sure all expenses are posted and checks are processed
Steps to Reconcile
 NAVIGATION: ACTIVITIES menu > Checkbook Reconciliation > Reconciliation Process
- Pick the Checkbook: From Checkbook ID, choose which account (checkbook) you want to match, i.e., 10, 20, 30
- Enter Statement Information
- Statement Balance – type in the bank statement’s ending balance
- Statement Date – enter the end date from the bank statement
- Adjustments/Bank Errors – If there are any bank errors requiring adjustments, enter the amount here.
- Click START RECONCILING
 At this point if you need to exit the reconciliation screen and return, re-enter the checkbook ID, bank statement information, and click START RECONCILING again. Your work from the previous session will appear, you will not lose any progress made previously.
- You will see deposits in the top Deposits/Credits section and checks that haven’t cleared yet in the Checks/Withdrawals section, up to the entered statement date
- Start Matching and Mark Cleared Items
- Look at your bank statement.
- Check off anything that cleared the bank.
- To clear a group of checks, enter a range of check numbers in the white fields and click PROCESS RANGE.
- Select the items that have cleared the bank. There are two ways to do this.
- OPTION 1: Using your mouse, enter a check in the SELECT column for each item.
- OPTION 2: To mark a consecutive range of check numbers as cleared, in the lower left is a PROCESS RANGE button with two blank boxes above it.
- In the first blank box enter the first check number
- In the second blank box enter the last check number.
- Press PROCESS RANGE.
- All of the check numbers for the range entered will be checked. (WITHDRAWLS ONLY)
- To clear all check marks and start over in selecting cleared items, click RESET.
- NOTE: This will not update the X cleared box in VIEW CHECK BOOK. The checkbook is not updated until you complete the reconciliation by clicking PROCESS RECONCILIATION.
- Verify Totals
- The Cleared Deposits total on the bank statement should match the cleared deposits total on the screen
- The Cleared Checks total on the bank statement should match the cleared checks total on the screen
- Make sure the “Difference” is $0.00. That means everything matches.
- If the difference is not zero, research and fix any discrepancies
Finish the Reconciliation
Only when the Difference is $0.00:
- Click PROCESS RECONCILIATION.
- Click YES to finish.
- This will update the checkbook with the cleared items from the reconciliation.
Reports to Print When Done
- Reconciliation Balance Report (Reconciliation Summary Report)
- Provides a summary of the reconciliation, including cleared transaction totals for the month.
- Navigation: ACTIVITIES menu > Checkbook Reconciliation Section > Balance Report
- Pick the checkbook ID
- End Date: the end date should always match the bank statement ending date
- Check the NOTIFY box and RUN REPORT button.
- Preview, print, or save the report (see Report Preview, Print and Save Options)
- Outstanding Item List
- Lists all deposits and checks that remain uncleared after reconciliation.
- Navigation: ACTIVITIES menu > Checkbook Reconciliation Section > Outstanding Item List
- Pick the checkbook ID
- End Date: the end date should always match the bank statement ending date
- Check the NOTIFY box and RUN REPORT button.
- Preview, print, or save the report (see Report Preview, Print and Save Options)
- Cleared Items List
- Shows all deposits and checks that were marked as cleared during the reconciliation process.
- Navigation: ACTIVITIES menu > Checkbook Reconciliation Section > Cleared Items List
- Pick the checkbook ID
- Start/End Date: make the dates match the month of the bank statement; the end date should always match the bank statement ending date
- Check the NOTIFY box and RUN REPORT button.
- Preview, print, or save the report (see Report Preview, Print and Save Options)
Reconcile Checkbook with Client Balances
Reconcile the checkbook ending balance with the client balances.
- Run the Client Balance summary report
- NAVIGATION: Reports menu > Client Balance Reports > Client Balance Summary
- Client Number: Leave the Client number blank for all.
- Start date and End date: enter as the month of the reconciliations, such as 7/1/2023 to 7/31/2023
- Pay Group: Select the Paygroup for the checkbook being reconciled.
- Run Report
- Go to the second to last page. Record the final total under Balanced column.

- Go to the last page. Record the amounts in the rows “Expenses without A/P Checks” and “Expenses with future Period Checks.
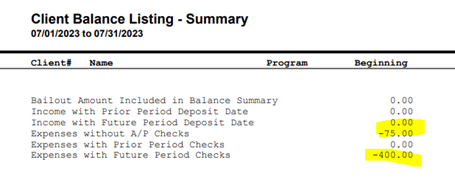
- Add back the expense values to the client balance total
- Example to calculate client balance
- Client Balance = client total balance (next to last page) PLUS Expense without A/P Checks PLUS Expenses with Future Period Checks (last page)
- $15,462.19 + 75.00 + 400.00 = $15,937.19
- $15,937.19 is the total client balance and should equal your checkbook balance for 7/31/2023
Bank Reconciliation Help
How to Find and Fix Errors
If the Difference is not zero after marking all cleared items, here’s how to track down common errors:
- Review Transaction Dates:
- In the reconciliation screen, only transactions dated on or before the statement date will appear.
- A transaction may be missing because it was entered with a future date.
- Go to your checkbook register and search for the transaction.
- If needed, edit the date so it matches the period being reconciled.
- Check for Incorrect Amounts:
- Compare the transaction amounts in your checkbook against the amounts on the bank statement.
- Look for: Miskeyed check or deposit amounts, Missing decimal points, Reversed digits
- Look for Duplicate Entries:
- Use the Checkbook Register to look for duplicate checks or deposits that could cause an overstated balance.
- Cancel or void any accidental duplicates before returning to reconcile.
- Investigate Outstanding Items:
- Print the Outstanding Item List to compare against prior months.
- If a check or deposit has remained outstanding for several months, it may indicate:
- A check that was voided but not recorded properly
- A deposit that wasn’t actually made
- A posting error
- Use Reports to Assist:
- Print and compare the: Cleared Items List, Outstanding Items List, Reconciliation Balance Report
- These reports help identify what was included or excluded from the reconciliation and can reveal inconsistencies.
- Handle Missing Transactions If a correction is needed:
- Exit the reconciliation process.
- Enter the missing transactions as an expenseor non-AP checks.
- Return to the reconciliation process; previously marked items will remain checked.
Helpful Tips
- Consistency: Reconcile every month.
- Documentation: Maintain copies of all reconciliation reports for auditing and reference purposes. Save and/or print reports for your records. Monthly Reconciliation Packet should include:
- Bank Statement
- Balance Report
- Outstanding Item List
- Cleared Items List
- Any posting registers from corrections
- Review Voided Checks
- Be aware that voided checks with a void date before the statement date will not appear in the reconciliation window, as the system automatically clears them.
- Review Outstanding Checks
- Review the outstanding items list for all deposits and checks that remain uncleared after reconciliation.
- If a check remains outstanding for an extended period, consider contacting the payee to confirm receipt.
- If necessary, void and reissue the check or write it off according to your policies, for example, check is automatically voided after one year
- Some checks may be reported as unclaimed property according to your policies.
- You can always view the current balance in the checkbook by going to NAVIGATION: ACTIVITIES menu > Checkbook Activities > View Check Book.
- Verify the reconciled checkbook ending balance equals the overall client balances. If there is a difference, review the client balance detail and correct identified issues.
- If you have voided a check and the void date used is before the statement date, then that check will not show in the reconciliation window, as the system will have automatically cleared it. If the void date used is after the statement date, then it will show in the reconciliation window with a V in front of the check number. You cannot mark this check as cleared.
- FOR EXAMPLE: Check #301 was printed/dated 1/20/2023.
- The check was voided using 3/10/2023 as the transaction date.
- You begin reconciling as of 2/28/2023. The check has not been voided as of 2/28/2023 so it is still outstanding. It shows as V000301 and will appear on the outstanding check reports for 2/28/2023.
- When you reconcile on 3/31/2023, check #301 will not appear in the reconciliation window and the system will clear it automatically.
4/2025