
Process 1099 Forms
Follow this instruction guide to print 1099 forms for AP vendors and create electronic submission files from the Financials Management program.
If your organization uses the Horizon Section 8 Management program, most organizations pull Section 8 1099 information to the same area as the Accounts Payable (AP) 1099 information. This will allow you to print both AP and Section 8 1099 forms together.
Important 1099 Processing Notes
- When to start processing?
- Typically, you may start your 1099 Process before receiving the Horizon year end software update. This would include Vendor W9/1099 Maintenance.
- Because the 1099 output requirements often change from year to year, you need to wait for the Horizon year end software update to be completed before PRINTING FORMS OR CREATING SUBMISSIONS FILES. The update will include the output requirements changes. If you print/submit files prior to the update, they may be rejected.
- Section 8 1099 Data
- You must pull using the Section 8 Version 16 program with the menu ribbon and start page.
- Do not pull using the old Section 8 Version 11 program. It will not work correctly.
- If you have AP and Section 8 1099 data, Horizon recommends that Section 8 data is pulled first, verified/corrected, then add AP data.
 CAUTION: 1099 data is often stored in the same file, both AP and Section 8 information will combine unless different values in Add to Reporting Group are used.
 - Section 8 and AP staff should coordinate who will:
- Run Remove ALL 1099 Information in Work File before pulling to delete last year's information
- Add to Work File
- Most steps can be run for either Financials or Section 8 with a few exceptions:
- Accounts payable data pull must be done in the Financials Management Module.
- Section 8 data pull must be done in the Section 8 Module.
- Sending Landlord 1099s to Stratus DocumentViewer can only be done in the Section 8 Module.
- If you have multiple companies set up, Horizon recommends that all 1099 information for the same Federal ID, state ID are pulled into one company.
- If there are multiple companies in Horizon, but these are for the same Federally recognized company that has one Federal ID, combine this information into one place by using the Add to Company option.
- IMPORTANT: Before pulling vendor information, make sure to complete the Vendor W9/1099 Maintenance steps.
- Verify that all vendors that need a 1099 have the Federal ID complete and not blank.
- If a vendor uses a Social Security number as the Federal ID and their personal name not a company name, make sure their name is entered in the fields for Last, First, Mid, and Suffix.
- This is not required if submitting paper copies to the state of Pennsylvania.
- Most Horizon customers are now required by Pennsylvania to file electronically. This step must be completed.
Step 1: Vendor W9/1099 Maintenance
You should start reviewing your vendors’ 1099 setup at least several days before you plan to pull and process 1099’s. For 2023 reporting, Horizon recommends you begin this review as soon as you receive the End of Year updates. This year’s update includes important changes to the review process.
The Vendor Maintenance Grid will show information from the Vendor Master that is used to create 1099 data. Review and update the vendor data before pulling 1099 data for this year. Any updates to vendor information will also update the Vendor Master.
 The Vendor Maintenance Grid is also available in the Section 8 module for Landlord W9/1099 Maintenance. The Section 8 department should be reminded to review the updated instructions to review the landlords’ information several days before the pull and process is to occur.
 NAVIGATION: TOOLS menu > Vendor W9/1099 Maintenance
- When the Grid opens, the default view will be set with filters Status: Active and 1099: Yes.
- The grid will display only the vendors set as Active and set to receive a 1099.
- Vendors with the checkmark in the 1099 column will create 1099s when pulled.
- Tab through the grid to review/edit information. The text field your cursor is in will be highlighted orange.
- Inactive Vendors: You may automatically mark long, unused vendors as Inactive.
- In the “Last Activity Date:” field enter a date. This date should not be in the current processing year. Horizon recommends going back a full year. If reviewing to process 2023 1099s, enter 12/31/2022. You can choose to go back two or more years if some vendors could be used infrequently.
- Click the “Inactive Vendor Status Update” button.
- The system will automatically change the status to “inactive” for any vendor that has no activity after the date entered, i.e., 12/31/2022. This includes voucher dates and check dates. This may shorten your list to review. Vendors can always be changed back to Active if used again.
- Review 1099: No Vendors
- Horizon recommends that you change the filters to 1099: No to review the names not receiving a 1099.
- Should any vendors displayed in the grid receive a 1099?
- If yes, click the 1099 column checkmark for the vendor and save the records.
- Return the filter to 1099: Yes filtering.
- You may notice several vendors are highlighted in red.
- These are vendors that the program has detected issues that need to be reviewed.
- Be aware the program will not detect every possible issue, please review all vendors displayed.
- Review each column for each vendor. Any incomplete or incorrect information may cause incorrect processing of the 1099s and rejection of uploaded electronic submission files.
- Vendor Number: This information cannot be changed once created. Vendor Number will be highlighted in red if an issue with the 1099 setup is detected.
- Vendor Name: This is the name currently used to process checks.
- Status: Currently you will see only Active vendors. Do not mark a vendor inactive unless you have not used or processed any payments for them in the current year.
- 1099: When checkmarked, the 1099 process will create a 1099 for this vendor.
- W9: This box is not required; however, Horizon recommends tracking that a W9 was received or not.
- If tracking W9 received, please review carefully the vendors not marked received.
- Are items such as Federal ID and ID Type completed correctly? Does the Federal ID look to be a real number or temp/fill in?
- Federal ID: review the Federal ID entered. This field is very important for processing.
- Any Federal ID highlighted yellow indicates a problem. Please review W9 or other vendor communications. Verify and enter a correct ID number.
- A blank ID – A valid ID must be entered for all 1099 before pulling and processing.
- Federal ID and Social Security numbers are nine (9) digits. Any entry not containing nine (9) digits will be highlighted.
- Please also look for fake temporary ID’s entered by staff that did not have correct information when setting up the vendor. These will be any ID that contains:
- Non-number characters
- String of all one number such as 111111111 or 999999999
- String of numbers in sequence such as 123456789 or 987654321
- ID Type: Horizon recommends completing the type as Federal EIN or Social Security Number.
- Any types that are blank will be treated as if it is a Social Security Number.
- Name Control: This is a required field for sending the electronic upload to the IRS. We recommend that this be completed.
- Enter the first four (4) characters of the company name or the first four (4) characters of the person’s last name
- For example: Ant & Pest Company use ANTP ; Donald Art use ARTD
- 1099 Name: To be used if different than the Vendor Name used for check printing.
- Last Name/First Name/Middle/Suffix: These name fields are used for the Pennsylvania State 1099 upload.
- If the ID Type is blank or Social Security Number, then the PA file requires the Name fields to be completed.
- If the ID Type is a Federal EIN, then you should leave the Name fields blank.
- When done, there should not be any red or yellow highlighted fields in the grid.
- Click the PROBLEMS ONLY checkbox. This will remove all vendors that the system does not detect any issues with. Recheck these remaining vendors for problems.
- Click APPLY to save any unsaved information.
Step 2: 1099 Preview Report
The 1099 Preview Report will show all the vendors who are selected in the maintenance grid and the amounts to be pulled for the date range entered. You can re-run this report as many times as needed to verify the information that will pull into the 1099 forms. This will NOT pull the amounts into the edit area to print 1099 forms.
NAVIGATION: UTILITIES menu > 1099 Preview Report
- Select a pay group or leave blank for all pay groups
- Start Date: Enter the beginning of the year you will be printing the 1099s for, i.e., 01/1/2023
- End Date: Enter the last day of the year you will be printing the 1099s for, i.e., 12/31/2023
- Preview/Print the report
- Go back to the Vendor W9/1099 Maintenance grid to update/correct any vendor information.
Step 3: Pull 1099 Information
New for 2023 – 1099 data will now be saved per year. Previous year information will be retained as Year 2022. Pulling for dates 1/1/2023 – 12/31/2023 will save the new data as Year 2023. This utility will pull the payment information for all vendors that are marked to send a 1099. Review Pull 1099 More Info on how this information is pulled.
NOTE: If you process Section 8 data, Complete the first Pull in the Section 8 Module. When completed and verified the information. Complete the second pull from the Financials Module.
NAVIGATION: TOOLS menu > Pull 1099 Information
- Starting date: Enter the beginning of the year you are reporting for, i.e., 01/01/2023
- Ending date: Enter the date for the end of year you are reporting for, i.e., 12/31/2023
- Vendor Pull Options. The vendor pull option depends on where you have the information entered in the Vendor Master for your 1099. Select the vendor pull options. Review the description of each option 1099 Vendor Pull More Info
- Main Vendor Name and Address (if you only use the main vendor Check Information address lines, select this option)
- Attention Line and Main Address
- 1099 Name Line and Address (if you have the 1099 Address tab in the vendor master completed, select this option. If the on the Vendor 1099 Address tab the Vendor Name is blank, then for this vendor the system will use the information on the Main tab)
- Work File Options 1099 Work File Options
Most often you will use the first setting “Add to Work File”. This will add the pulled data to the work file as this year’s information. Only use the other two (2) options when you have already pulled for this year and need to make corrections by removing and repull.- Place the dot in Add to Work File. This will keep any information for this year, such as Section 8 information generated during the first pull and add to the information.
- Re-Create Work File for Reporting Group Selected – used only by users of the special options of pulling by Reporting Groups. Used to remove and recreate after an issue with 1 Reporting Group.
- Remove ALL 1099 Information in Work File before Pulling – Use this only to delete all 1099 information already pulled for this reporting year to start the process over.
- Select Combine Payees By Tax ID is strongly recommended.
- Any vendors with the same Federal ID will be combined on one 1099.
- This is useful when a vendor has more than one company name for payments, but has only one Federal ID. Some vendors may be doing business under several company names but reporting all under one Social Security Number.
- The IRS considers these as one entity and should be combined on one 1099 per the IRS rules.
- Click PULL
- You can repeat this process using the Work File Options.
- If you are not satisfied with the outcome, you may go back and edit the Vendor Master or Void checks.
- Then repeat the Pull 1099 Information steps using the Recreate or Remove All options.
- Be careful if Section 8 information has already been pulled as you could wipe out that information as well.
Step 4: Edit 1099 Information
This step will allow you to any information that will appear on the 1099. Review Edit 1099 More Information. Once the AP and the S8 pulls have been completed, both sets of data will be combined in this Edit Utility.
NAVIGATION: UTILITIES menu > Edit 1099 Information
- At the top of the form is the YEAR filter. Check that the correct reporting year is selected.

- In the CONTROL NUMBER field, click the browse icon.
- Select the vendor you want to edit.
- Click OK.
- Edit/change vendor information
- Edit any information that was not corrected in Step 1.
- Use the MISC, NEC, and Interest tabs to view/edit data for the type of form to be submitted
- Click SAVE.
- To delete a record from the 1099 file:
- In the CONTROL NUMBER field, click the browse icon.
- Select the vendor you want to delete. Click OK.
- Make sure your cursor is in the CONTROL NUMBER field.
- Click DELETE.
- Click YES when prompted.
- To manually add a 1099 to the file:
- Click Clear/Add
- Leave the CONTROL NUMBER field blank.
- Enter all necessary information.
- Click SAVE.
NOTE: The electronic 1099 (S8 Only) checkbox will flag the 1099 to not print the vendor copy and only send to the Horizon Stratus DocumentViewer Service. This should only be used for Section 8 Landlords that will access their 1099 from Stratus DocumentViewer.
Step 5: Review Name Control Information
The Name Control should be a four (4) character ID using the first four letters of a person's last name or the first four letters of the company name. Do not use special characters such as spaces, -, !, @, #, etc. Please review IRS Publication 1220 for complete instructions on name control rules.
If you are submitting the 1099s electronically to the IRS, the name control fields are required.
NAVIGATION: UTILITIES menu > Review Name Control
- Manually enter name control information for vendors missing the information.
- You may also click on the GENERATE NAME CONTROL INFORMATION (BEST GUESS) button at the bottom left.
- Review the grid results for errors.
- This program makes a best guess at the name control and should be reviewed.
- Click SAVE
Step 6: Final Edit List
NAVIGATION: UTILITIES menu > Final Edit List
- Enter a Reporting Group or leave blank for all
- You can customize the report based on the options.
- Select up to three different report options from the column selections available to print on the report.
- If your company uses Section 8, always include Rents.
- Dollar Limit
- Enter a dollar amount to preview or print a report for 1099s above the amount entered.
- For example: if 600.00 is entered as the limit, only 1099s with totals above 600.00 will be shown on the report.
- Electronic: Select
- All
- NOT Electronic
- Electronic Only
- File Mode: Select
- All
- 1099 NEC Only
- 1099 MISC Only
- 1099 Interest Only
- Print/Preview the report to review.
- If any of the information is incorrect on the report, correct the vendor information in Step 4.
Recommended NEC Report Options
- Dollar Limit: Enter 600.00
- Electronic: Select All
- You may run also as the electronic and not electronic if you want this data.
- File Mode: Select 1099 NEC Only
- Column 1: Select Non-Employee Comp
Recommended MISC Report Options
- Dollar Limit: Enter 600.00
- Electronic: Select All
- You may run also as the electronic and not electronic if you want this data.
- File Mode: Select 1099 MISC Only
- Column 1: Select 1. Rents
- Column 2: Select 2-15. Use which ever category that may have data
- Column 3: Select 2-15. Use which ever category that may have data
Step 7: Verify Financials/Section 8 Program Versions
REQUIRED: Users should verify they are using an updated versions of the programs to ensure that the printed 1099s comply with current requirements.
NAVIGATION: ABOUT
- Click About in the top right corner of the program
- Financials should be version 16.201.25.1 or later
- Section 8 should be 16.201.25.2 or later
Step 8: Print 1099 Forms
Before printing, make sure you verified and reviewed all vendor information in the previous steps.
WARNING: Make sure you are not set to print double sided to your printer. You can use Print with Setup to select your printer Then Preferences to select options, i.e., 1-Sided.
NAVIGATION: UTILITIES menu > Print 1099 Forms
Review the Recommended Printing Steps
- Company Information - If the correct company information is not displayed, enter it in the appropriate lines.
- This information is pulled from the SYSTEM menu > Company Information. Make sure to update for future 1099 processing.
- Verify the correct Federal ID is entered with no spaces or hyphen.
- Sequence
- Year to Print: Enter the reporting year to print at the top of the 1099 forms.
- Electronic: Select one of the following:
- Not Electronic Only (paper)
- All
- Electronic Only
- Form Mode
- Select the Form to Print: MISC, NEC, or INT
- Warning: Changing this selection will also change the Format information selected to the Pre-Printed version.
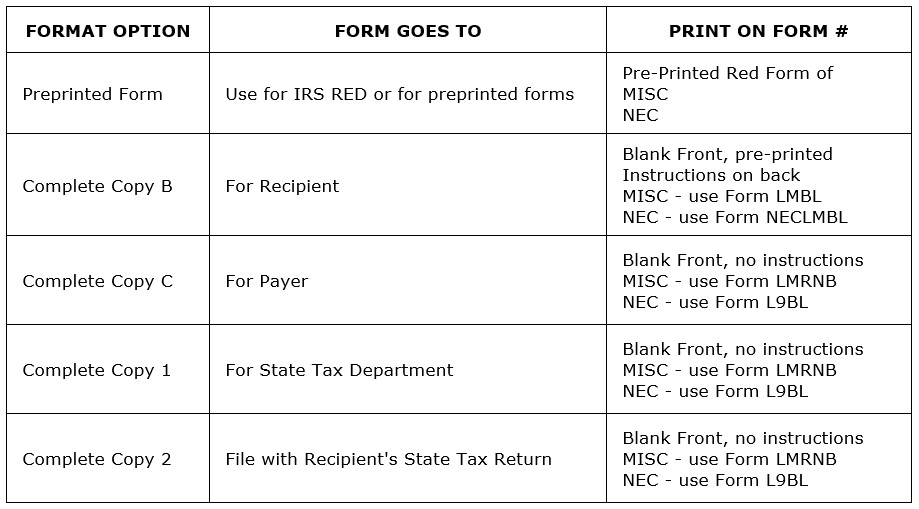
- Format Information
- Use the drop down to select which form you want to print. Formats with COMPLETE in the name may be previewed to review before printing.
- Dollar limit: Enter a dollar amount to print 1099s above the amount entered. For example, if 600.00 is entered as the limit, only 1099s with totals above 600.00 will be printed.
- Use the drop down to select which form you want to print. Formats with COMPLETE in the name may be previewed to review before printing.
- PRINT
- When all information has been entered and all selections are made you may Print.
- Click PRINT to allow default to your default printer/use PRINT WITH SETUP to select the printer and options.
- Test print the first two vendors (enter control number in Starting/Ending control field) to plain paper (or on an extra form) hold it up to a form to see if it is aligned. If the form is not printing in the boxes properly, use the adjustments.
- Horizon recommends test printing the 1099 IRS Red Copy and other pre-printed forms not purchased from Horizon.
- Review your pages for any alignment problems. Increase or decrease the adjustment values until the printing aligns within the boxes.
- Once you are satisfied with the test print, print the information on the tax forms.
- Adjustments: There are two sets of adjustments: Top form and Bottom form.
- If both forms need to move the same amount, then use the same amounts for both forms.
- Entering an amount in the Top form will not move the bottom form.
- Up/Down - If printing to low on page enter -25, if printing to high enter 25.
- Left/Right - If printing to far to the right enter -25, If to far to the left enter 25.
- Recommended: Horizon strongly recommends saving a PDF copy of the 1099 forms.
- Use format information Use the Complete Copy B For Recipient or Complete Copy C for Payer. so you can easily reprint any vendor 1099 if needed.
- Use the Export – PDF or Email options
- The file should be saved on your server where it is backed up and can be found if needed in the future.
- Repeat the steps for printing the 1099 forms until you have all of the MISC, NEC, and Interest forms that you need printed.
- The 1096 form is not available to print and must be completed by hand.
Step 9: Section 8 Publish 1099 to Stratus DocumentViewer
This process will publish the 1099 forms to the Document viewer so landlords can log in and download/print.
If your company uses Section 8 and the Stratus DocumentViewer for Landlords, this step is required.
In the Section 8 program:
NAVIGATION: UTILITIES menu > Publish 1099 Form
- Verify all Company Information is entered as in previous steps.
- Enter the Year to Print.
- Click Publish Forms.
- When complete you may view Published 1099s in the Landlord Master Attachments.
Stratus DocumentViewer will publish 1099 MISC forms only. If a Landlord also requires a 1099 NEC a paper copy must be sent. NEC forms will not appear on Stratus DocumentViewer.
 VIDEO: How To Send Landlord 1099 Forms to the Document Viewer
Step 10: Create Electronic 1099 Files
- If you are submitting your 1099 information electronically to the IRS, there is no need to print the red copy of the 1099 or the 1096.
- NOTE: The name control field is required when submitting electronic files. Make sure the name control field is filled in on all 1099 records. See Review 1099 Name Control Information
- There a four file types created in this process based on the field selections in Agency Mode and in Form Mode.
- Follow the directions in How To Process Electronic 1099 Files to create the electronic files needed to submit to the IRS and Pennsylvania.
VIDEO: How To Process 1099 Forms
11/2023