![]()
![]()
Revised: 08/17/2011
Go to Activities>>Purchasing>> Purchase Order Entry
This program is used to enter and edit purchase orders.
At the top of the view are functions such as save and delete. For more information on functions, click here.
Purchase orders that have not been posted may be deleted in this program if the program is set to allow deletions in Purchase Order Settings.
Vendor Master
The current year will be automatically filled in by the system. The year is set and maintained under Settings; Purchase Order Settings.
When a new purchase order is saved this number will be automatically generated by the system. To retrieve an existing purchase order enter, select or browse for the purchase order number.
Note: The year and PO number will save as the full PO number. You may pull up any un-posted purchase order to edit it. The purchase order may be deleted if allowed. If deletions are not allowed, the purchase order may be voided.
The system will auto fill the current date or a different date may be entered or selected.
Select one of the following types:
PO
Void
Hold
This field is checked when a purchase order has been approved and the Materials Management program has been setup to use an approval process.
Depending upon the levels of approval set, the approved status may be removed if a change is made to the purchase order.The system will place a check mark in this field when a purchase order has been printed. Depending on the Purchase Order Settings for PO Printing Approval, these fields may be dimmed and will not allow the user to change them.
Depending on the Purchase Order Settings for PO Printing Approval this field may:
With the file set to Printing Allowed - Have a check mark entered in this field after a purchase order has been printed to indicate that it may be posted. Remove the check mark if the purchase order should not be posted.
With the file set to Print Draft PO Only - This field will be dimmed and allow no user interface. Purchase Orders must be approved for printing and posting.
With the file set to Approval Required for Printing - This field will be dimmed and allow no user interface. Purchase Orders must be approved for printing and posting.
Enter or select vendor information using either the vendor number or vendor name fields. Vendors are setup and maintained in the Vendor Master.
The address entered in the Vendor Master for the purchase order will be displayed in these fields.
Enter a contact name for the purchase order vendor. This field may be left blank.
Select the delivery location from the drop down list. This list is setup and maintained by users under Maintain; Purchasing Tables; Deliver to Location Master
Click the Sales Location Search button to pull up the ship to browse. Select a Customer Number or Name to search for an alternate delivery location. This information pulls from the Horizon Sales module and may not be applicable for everyone.
The name of the button will change to Pull From Ship To's after it has been accessed.
The name set up in the Deliver to Location Master will be automatically pulled into this field. Names typed into this field cannot be saved.
The address entered in the Deliver to Location Master will be displayed in Address 1, 2 and CTZ.
The contact information entered into the Deliver to Location Master will be the default information pulled into this field. The attention line may be entered/changed for this purchase order only and will not affect default information entered in the Deliver to Location Master.
Enter your company's account number with the selected vendor. This is not a required field and may be left blank.
Enter the name of the person requesting the items.
Select delivery terms from the list. This field may be left blank.
Delivery terms may be setup in Settings; Global Table Maintenance. The code to enter is POFOB. The program will need restarted after a delivery term has been setup in order to be available for selecting.
Select shipping terms from the drop down list.
Shipping terms may be entered in Settings; Global Table Maintenance. The code to enter is POSHIPVIA. Materials Management may need restarted after a new code is entered in order to be available for selecting.
If the vendor has assigned an order number for this purchase, enter it here.
If you are tabbing through the fields, the system will place the initials of the person who is logged in as the default originator. The originator information may be edited as needed.
Select the appropriate class from the drop down list. The class list is set up and maintained by users in the Class Master program.
Select the appropriate department from the drop down list. Departments are set up and maintained by the user in the Department Master.
Note:
Dependant upon customized settings, this field may have another name such as Community.
The paygroup will default to the one setup in Purchase Order Settings. The default paygroup may be retained or another may be selected for the transaction. Paygroups are setup and maintained in the Pay Group Master.
The Pay Group Master is available in several modules and sets the Company/Fund ID, general ledger accounts, Check Book and Interfund Code (when applicable) used for Purchase Order transactions.
Enter the date the items on the purchase order are needed.
Select the appropriate payment terms.
Select the appropriate terms for the freight.
Additional freight terms may be entered in Settings; Global Table Maintenance. The code to enter is POFREIGHT.
Place a check mark in this field if the purchase order is for more than one department. This field is only available when Purchase Order Settings has Department Mode checked under General>>Options.
Place a check mark in this field if the items ordered are to be delivered to several locations.
Place a check mark in this field if this purchase order is being sent to confirm an order given by another means. A confirming notice will be placed on the PO when it is printed.
Place a check mark in this field if this purchase order is of a blanket type. Once a blanket PO has been posted additional items may continue to be added in Purchase Order Maintenance.
For example:
If the office selects a vendor to provide general cleaning and janitorial supplies and will be ordering on a bi-weekly or monthly basis, a Blanket Purchase Order should be used rather than a separate Purchase Order each period.
This view is in two sections. In the top section you will enter and edit lines. Below is the line window grid, do not edit line information here, select the Edit ![]() box to bring the line above for editing.
box to bring the line above for editing.
Displays the gross amount of the purchase order. As lines are entered, the gross amount is updated.
Leave the line number blank when entering a new line. The system will automatically increment to the next number when the current line is finished. Lines will not be saved until you have entered or tabbed through all of the fields and the line has dropped into the window grid.
A line number for a previously entered line that is displayed in the grid may be entered to bring the line up into the entry area for editing.
Enter, select or scan the vendor item number to be ordered. Vendor item numbers are setup and maintained in the Vendor Item Master.
After scanning the part number, press Tab to either Quick Add or Detail Add the Vendor Item Number, if applicable.
The description defaults to the one entered in the Vendor Item Master; however you may change or add to the description. The vendor item master will not be updated with the changed description.
Enter the quantity to be ordered.
Unit of measure will default to a unit of measure or one of the following may be selected:
Barrels
Box
Case
Dozen
Each
Feet
Gallon
Hundreds Per
Inches
Pair
Six Per
Thousands Per
If a unit cost has been setup for the item, it will be displayed. Accept the default unit cost or enter a new unit cost. When a new cost is entered an Update box will be displayed.
Click Yes if the entered cost should update the cost in the Vendor Item Master.
Click No if the cost is not to be updated.
Place a check mark in the box if the cost entered for the item should update the cost in the Vendor Item Master.
Displays the cost per unit times the quantity ordered.
The short description defaults to the description entered in the Vendor Item Master. Users may enter their own short description. The description in the vendor item master will not be affected.
Enter a date expected for each line or leave blank to default to the want date entered on the front screen.
This field is only available when Financial Accounts Payable has been set to Inter-Fund. Enter or select an appropriate IFC Code, when applicable, to charge the Item expense for each line. Vendor items can be expensed to a different fund, project or project than the payment which is controlled by the Paygroup on the Main tab.
Enter or select the appropriate general ledger number to associate with the line item.
Select the appropriate class from the drop down list. The class list is set up and maintained by users in the Class Master.
Place a check mark in this field if this item may be back ordered.
Upon entering or tabbing through the B/O field the line will drop down into the window grid on the bottom half of the screen and is saved. If a line is not showing in the grid, it will not save.
Place a checkmark in the edit field to bring the line into the entry area above for editing.
Enter any comments for the purchase order in this text field. Depending upon the purchase order format used, the note should print on the purchase order.
Comments entered in this area will not print on the purchase order.
Click the Add button to open a "Select a File" dialog box. Browse to the drive/folder and select the document that is to be attached. Click the open button to complete the attachment process.
Highlight an attachment and click the delete button to remove it.
Click the Open button to open the document for viewing.
Attach a word document or a scanned document by dragging and dropping the file onto the import icon shown below.
![]()
The date the attachment was added and its name will be shown in the grid.
Users may open an attachment by highlighting it and clicking the Open button.
An attachment may be removed by highlighting it and clicking the Delete button.
Go to Activities>>Purchasing>>Purchase Order Entry>>Quick Link>>Print Purchase Order
Select this menu option to open a print dialog box. Select a printer and click Print. The purchase order is then checked as Printed and OK to Post in Purchase Order Entry.
F11 is the shortcut key to print a purchase order.
If the purchase order must be approved before it is printed, the program will alert the operator of this fact when this option is selected.
**************************
Go to Activities>>Purchasing>>Purchase Order Entry>>Quick Link>>Email Purchase Order
This menu option opens an Eamil Interface program and will generate a copy of the purchase order in a pdf format which will be linked to the email that is to be sent.
Will display or allow entry of the email address of the sender.
Click the header to view email addresses that have already been entered. Select one of the displayed email addresses or enter one or more on the lines provided.
Click the Add Attachment button to open a "Select a File" dialog box. Select one of more files to attach to the email.
Highlight a displayed attachment and click the Remove Attachment button to remove it.
Accept the default subject, add to it or enter your own. The default subject is setup in Purchase Order Settings on the Email tab.
Accept the default email message, add to it or enter your own. The default message is setup in Purchase Order Settings on the Email tab.
Click the Send button to send the email with the attached purchase order.
Click the Close button to close the Email Interface.
******************
Go to Activities>>Purchasing>>Purchase Order Entry>>Quick Link>>Request Approvals
This program is only available when the program is setup for Approvals to be required for purchase orders. When selected from the menu an approval request will be generated and sent to the person who is set to approve the purchase orders.
Approval settings are found in Purchase Order Settings.
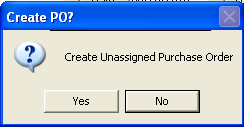
Go to Activities>>Purchasing>>Purchase Order Entry>>Quick Link>>Create Unassigned Purchase Order (Alt-C)
This program will create an unassigned purchase order number. Alt + C is the keyboard shortcut.
A confirmation box (shown below) will be displayed when this option is activated or selected from the menu.
***************
Go to Activities>>Purchasing>>Purchase Order Entry>>Quick Link>>Recalculate Purchase Order
This program will run a process to recalculate the purchase order.
Select this option from the quick link menu if you have made adjustments to the purchase order and the totals are not correct.